
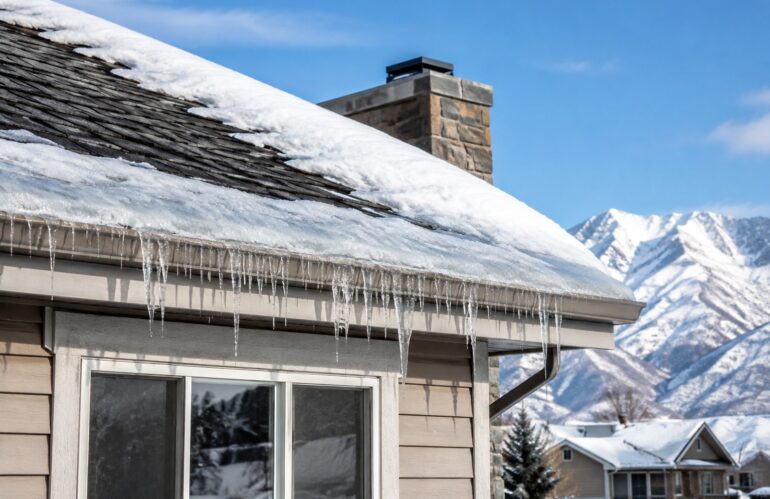
Here is the part most roofing companies will not tell you: ice dams are not a roofing problem. They are an insulation and ventilation problem that happens to show up on your roof. Learning how to prevent ice dams means fixing what is going on in your attic, not buying a new roof, and any contractor who leads with a re-roof quote is answering a different question than the one you asked. Published now, well ahead of the first real snow, because every genuine fix on this list has to happen before the roof is covered.
QUICK ANSWER
Ice dams form when heat escaping your attic melts snow on the upper roof, and that water refreezes at the cold eaves. Prevent them by air-sealing attic bypasses, adding insulation to reach R-49 or higher, and balancing soffit and ridge ventilation so the roof deck stays the same temperature as the outside air.
The heat-loss mechanism, explained
An ice dam needs three things at once: snow on the roof, an upper roof surface above freezing, and a lower roof edge below freezing. Your attic supplies the middle one.
- Warm air rises out of your living space into the attic through gaps around light fixtures, bath fans, plumbing stacks, the attic hatch, and top plates.
- That heat warms the underside of the roof deck over the heated part of the house, which is the upper two thirds of most roofs.
- Snow against the warm deck melts, even when the outside air is well below freezing.
- The meltwater runs down under the snowpack until it passes the exterior wall line and reaches the eave and overhang, which have no heated space beneath them.
- At the cold eave it refreezes, building a ridge of ice.
- The ice ridge dams subsequent meltwater, which pools behind it as standing liquid water, then works backward under the shingles and into the house.
[DIAGRAM PLACEHOLDER] Cross-section illustration of a roof and attic showing warm air escaping the ceiling plane, the melt zone on the upper roof, meltwater running down under the snowpack, and the ice ridge forming at the cold eave with water backing up behind it. Suggested caption: Heat escaping the attic melts snow above the heated space. That water refreezes at the unheated eave and dams everything behind it.
Read that sequence twice, because it explains every recommendation below. Shingles are designed to shed running water, not to resist standing water pushing sideways and upward. The failure is not the roof. The failure is the temperature difference.
Why heat cables treat the symptom, not the cause
Heat cables, the zigzag electric elements stapled along an eave, are the most visible ice dam product and the most misunderstood. They do one narrow thing: melt a channel through an ice dam so water has a path off the roof.
- They do not prevent the dam. The dam still forms. The cable just keeps one drainage route open through it.
- They cost real money to run. Continuous operation through a northern Utah winter is a measurable line on the power bill.
- They have a short service life and are typically replaced every three to five years.
- They can damage shingles where installed carelessly, and the fasteners themselves create penetrations.
- They are the right answer occasionally. On a north facing valley, a complex roof geometry that cannot be ventilated properly, or an unconditioned cathedral ceiling with no attic to fix, cables may be the only practical option.
Treat them as a last resort after air sealing, insulation, and ventilation have been addressed, not as the first purchase.
Attic air sealing: the highest value fix per dollar
If you do exactly one thing from this article, do this one. Insulation slows heat transfer; air sealing stops heat from physically moving into the attic, and moving air carries far more heat than conduction does. Sealing typically costs a fraction of an insulation upgrade and delivers more of the result.
The bypasses that matter most, roughly in order:
- Recessed can lights. Older non-IC-rated cans are effectively open chimneys into the attic. Airtight covers or replacement with sealed LED units.
- The attic hatch or pull-down stairs. Frequently the single largest hole in the ceiling plane. Weatherstrip it and add a rigid insulated cover.
- Bath and kitchen exhaust fans. Seal the housing to the drywall, and confirm the duct terminates outside the roof or wall rather than dumping into the attic, which is depressingly common.
- Plumbing and electrical penetrations. Every stack, wire, and pipe passing through the top plate. Fire rated foam or caulk.
- Top plates of interior walls. The gap between drywall and framing along every wall, hidden under insulation.
- Chimney and flue chases. Sealed with sheet metal and high temperature sealant, never with foam.
- Duct boots and any HVAC in the attic. Leaky ducts in an unconditioned attic are both an ice dam cause and an energy bill problem.
This is dirty, awkward work in a tight space, and it is worth either a careful weekend or hiring it out. Either way it must come before adding insulation, because insulation covers the very holes you need to find.
Insulation targets for the Utah climate
Most of northern Utah sits in climate zone 5, with the higher Summit County elevations in zone 6. Current recommendations for attic insulation in these zones are R-49 to R-60.
- R-49 is the practical minimum. That is roughly 14 to 16 inches of blown fiberglass or about 13 to 15 inches of blown cellulose.
- Most homes built before 2000 have far less. We routinely find R-19 to R-30 in Ogden and Layton attics, which is half of target.
- Depth is measurable in five minutes. Push a ruler down to the drywall in three different spots and average. Under ten inches means you are well short.
- Coverage matters as much as depth. Insulation that stops short of the exterior walls leaves the coldest, most dam-prone part of the assembly uninsulated. This is extremely common and is exactly where a dam starts.
- Never block the soffit vents. Insulation pushed into the eaves cuts off intake air and makes the problem worse. Baffles hold the channel open, and they are cheap.
Balancing soffit intake to ridge exhaust
The goal of attic ventilation is counterintuitive: you want the attic to be cold. A roof deck at the same temperature as the outside air cannot melt snow, and a dam cannot form.
- Aim for roughly 1 square foot of net free vent area per 150 square feet of attic floor, split about evenly between intake and exhaust.
- Intake is at the soffits, exhaust is at the ridge. Cold air enters low, warms slightly, and exits high. That convective loop is what keeps the deck cold.
- Insufficient intake is the most common failure. Adding ridge vent without opening up soffit intake can actually make things worse, because the ridge then pulls conditioned air from the house through ceiling gaps.
- Do not mix exhaust types on the same attic space. A ridge vent combined with powered or box vents short circuits the airflow, pulling air in through the nearest opening instead of from the soffits.
- Check the soffits from the ground. Painted-over perforations and insulation blocking the vent channel are both easy to miss and easy to fix.
Our overview of roof vent types walks through the specific components and how they should be combined.
Ice and water shield at the eaves during a re-roof
Everything above prevents dams. This one limits the damage when a dam forms anyway, which in a heavy snow year it eventually will.
Ice and water shield is a self-adhering waterproof membrane installed directly on the deck at the eaves before underlayment and shingles. It seals around nail penetrations and creates a genuinely watertight layer that standing water cannot get past. Best practice in our climate is coverage extending at least 24 inches inside the interior wall line, which on a typical overhang means two or three courses rather than one, plus full coverage in valleys and around penetrations.
It costs very little relative to a full roof, it can only be installed during a replacement, and it is the difference between an ice dam being an annoyance and an ice dam being a ceiling repair. If you are replacing a roof in northern Utah, confirm the coverage in writing. Our roof installation and repair page covers how we detail it.
Safe removal if a dam has already formed
If ice is already on the eaves, the priority is getting water off the roof without damaging it or yourself.
- Do use a roof rake from the ground. Pulling snow off the lower three or four feet of roof removes the fuel supply. This is the single best in-season action.
- Do consider calcium chloride in a fabric sleeve laid perpendicular across the dam to melt a drainage channel. Slow, but safe for the roof.
- Do call for professional steam removal if water is entering the house. Low pressure steam melts ice without damaging shingles.
- Do not chip, hammer, or chisel. You will destroy shingles under the ice, and the roof will leak in spring regardless of the dam.
- Do not use a pressure washer or salt. Pressure damages shingles; rock salt corrodes flashing, gutters, and metal, and kills the landscaping below.
- Do not get on a snow covered roof. This is how people end up in the hospital. If it requires a ladder in winter, it requires someone insured. See emergency roof repair if water is already coming in.
Keep gutters clear going into winter as well. A gutter packed with leaves freezes solid early and gives a dam a head start. Our gutter repair service handles the ones that are sagging or pitched wrong.
Book a Pre-Winter Attic and Roof Ventilation Assessment
Frequently Asked Questions
What causes ice dams on a roof?
Heat escaping from the attic warms the upper roof deck and melts snow. That meltwater runs down to the unheated eave, refreezes, and forms a ridge of ice that traps standing water behind it, which then works back under the shingles.
How do I stop ice dams permanently?
Air seal the ceiling plane, bring attic insulation to R-49 or higher, and balance soffit intake with ridge exhaust so the roof deck stays at outside temperature. Those three together address the cause rather than the symptom.
How do I remove an ice dam that has already formed?
Rake snow off the lower few feet of roof from the ground, lay calcium chloride in a fabric sleeve across the dam to open a drainage channel, and call for professional steam removal if water is entering the house. Never chip at it.
Do heat cables prevent ice dams?
No. They melt a channel through a dam so water can drain, but the dam still forms. They are a reasonable last resort for roof areas that cannot be properly insulated or ventilated, not a first fix.
How much snow is too much on a roof?
Most residential roofs handle roughly 20 to 30 pounds per square foot. Fresh light snow runs about 7 pounds per foot of depth, wet compacted snow far more, so two feet of wet snow or any significant ice layer warrants attention.
Does a new roof stop ice dams?
Not by itself. A new roof with proper ice and water shield limits the damage a dam causes, but if attic heat loss and ventilation are unchanged, dams will keep forming on the new roof.